Add Annotations
Annotations can be added to images, taxa or images that are inside a collection. Annotations are possible in Morphbank anywhere the
Click the Annotation Icon  to add
a New single (one at a time) annotation or click on several images inside an image collection to annotate
mass (multiple) images at one time.
Adding new single (or Mass) annotations:
After logging in, a user may create Single annotations from
- Browse - Images > Click
 to open Add Annotation Screen > Choose the type of Annotation and complete the required
fields.
- My Manager > Images tab / Taxa tab or / Collections tab
- Use the Keywords search to limit the set of objects to be annotated
- In the Collections Tab, choose a collection, open it, click on the
 to add a single annotation to any particular image in the collection or the
 of any object in a collection.
- To annotate more than one image in a collection, check all to be annotated and choose Annotate Checked Objects... from the left menu bar to open the Mass Annotation Screen. Fill out the required fields and click Submit.
- My Manager > Taxa tab > Toggle to OTU > open an OTU with the "Info Icon" or OTU title > click the Annotate Icon for any taxon name in the OTU to open the Add Annotation screen. Complete the fields; be sure to note or change the date-to-publish and click Submit.
Single annotations are created through Browse - Images, through the results of a Search, through an existing annotation (annotation - show, etc.) or through a Collection (i.e. browse - collection, collection, collection - show etc.)
For example, to reach the Add Annotation screen, logged-in
users can select the annotation  icon located
beside the thumbnail image of the record to be annotated as seen in Browse - Images (see next) or through
the results of a Search.
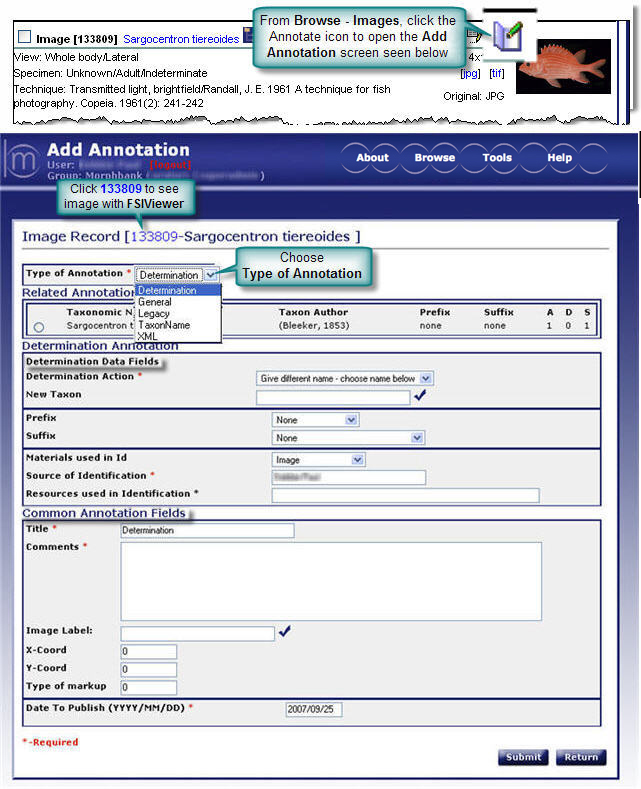
The Add Annotation screen is accessible from many places in Morphbank.
- Browse - Images >
 icon
icon - Search >
 icon
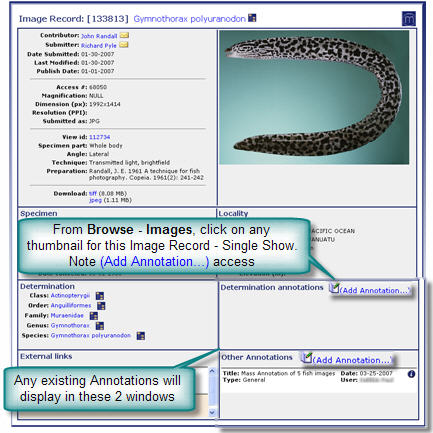
icon - Browse - Images > click any thumbnail or
 to open Image Record - Single Show> scroll down to click on "Add Annotation"
 - Header Menu > My Manager > Annotation tab: Click the
 to open the
Single Show for the Annotation. To add an Annotation, click on Add Annotation.
- Type of annotation*: The default is Determination Annotation. The other options of General, Legacy, XML, and Taxon Name are selected from the drop-down list. For a description of these annotations, jump to Types of Annotations.
- Related annotations: (field with Determination Annotation) The user can select from a list of previously
submitted, related determination annotations for that image. To select the related annotation, click on the radio button to the left of
the taxonomic name. This field also contains a history of the previous
annotations (author, prefix/suffix, A (agree with taxon name), D (disagree with
taxon name), S (number of specimen(s) associated with this determination
and collection of images).
Attributes of Related Annotations in the list for a single determination annotation:
- All annotations in the list have the same specimen (specimen id)
- All annotations in the list must be determination annotations
- Included in the related annotations list is the initial determination placed in the specimen record.
This means that all of the images associated with a single specimen will have the same related annotations visible in a determination annotation. - Determination action*: (field with
Determination Annotation) Choose to agree, disagree, or agree
with qualification (to agree with the taxon but not with a listed prefix or suffix).
- Agree: The user must choose a previous determination using the radio buttons to the left of the related annotation. An annotation record will be added that agrees with that taxonomic name, prefix and suffix.
- Disagree: The user must choose a previous determination using the radio buttons to the left of the related annotation. An annotation record will be added that disagrees with that taxonomic name, prefix and suffix.
- Qualify lowest rank: The user must choose a previous determination using the radio buttons to the left of the related annotation. Additionally, the user will have the ability to qualify the taxon with a prefix and/or suffix. (These appear only after the qualify option is selected) The combination of taxonomic name/prefix/suffix must be unique (if there is a duplicate, an Agree annotation will be added).
- New taxon: (field with Determination Annotation)
If no related annotation was chosen from the list, the user has the
option of selecting a new Taxon name from a list. To insure accuracy,
taxonomic names need to be selected
 from the Taxon Name Search selection
screen. Traverse through the levels by clicking on the desired taxon until the appropriate scientific
name is found. Then click the select icon
  ; it will automatically direct
the user back to the Add Annotation screen and the appropriate name will be
filled in.
If a new taxon name needs to be added select the Add New Taxon button that is visible from the family level. The Add Taxon Name screen will popup. (This option is only available for authorized users.) For complete instructions on this process see the ITIS, Add New Taxon section of this manual.
- Prefix/suffix: (field with Determination Annotation) Only available if user chose to agree with qualification or chose
a new taxon name). Uses can choose a prefix or suffix from the appropriate
drop-down list to qualify their determination action.
Prefix options include:
- None
- Not
- Aff (affinity with)
- Cf (compare with)
- Forsan (perhaps)
- Near (close to)
- Of lowest rank
- ? (questionable)
Suffix options include:
- None
- Sensu lato (in the broad sense)
- Sensu stricto (in the narrow sense)
- Of lowest rank
- Materials used in id: (field with Determination Annotation) Indicate the materials examined to formulate this determination annotation by selecting an option from the drop-down list.
- Source of identification*: (field with Determination Annotation) Enter the name of the person who made the determination. The default for this option is the logged-in user. The name can be changed if the annotation is being made on behalf of someone else.
- Resources used in identification*: (field with Determination Annotation) Indicate the resources used to support the determination annotation. This is a free text entry for information such as citations of literature or expert opinion.
- Title*: Click on this field to change or enter a title for the annotation. The default title is Determination for a determination annotation. For other types of annotations enter an appropriate descriptive title.
- Comments*: Enter comments to support the annotation or comments that might aid other users to understand the particulars of this annotation, or add any other information that might be useful to keep with the annotation. Examples: explain why the specimen was identified with the particular taxon, comment on an image marker placement etc.
Image label: When annotating a single image, the user has the option of identifying a location on the image to associate a pointer or box and a label (If annotating a group of images this option will not be available).
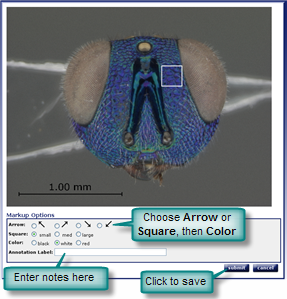
To add a marker to the image, select the
 beside the Image Label field. The current image will display. Click on the screen
(do not drag) where the point of the marker or corner of the box is to be located. To reposition the marker
or box, click on the screen in the new location. The old marker will be replaced by a new marker.
The marker/box color can be selected. Click the radio button next to the desired
color (choices are red [default], white and black). To add a label to the marker, type the label in the Annotation Label field
provided on the screen.Note: Only one marker and label is available for each annotation. Multiple markers require separate annotations for each desired marker and label.When the image has been marked and labeled, select submit. The screen returns to the add annotation screen. If a marker label was added, it will show up in the Image Label box. As long as the annotation is not yet published, a submitted marker can be changed through edit annotation.
beside the Image Label field. The current image will display. Click on the screen
(do not drag) where the point of the marker or corner of the box is to be located. To reposition the marker
or box, click on the screen in the new location. The old marker will be replaced by a new marker.
The marker/box color can be selected. Click the radio button next to the desired
color (choices are red [default], white and black). To add a label to the marker, type the label in the Annotation Label field
provided on the screen.Note: Only one marker and label is available for each annotation. Multiple markers require separate annotations for each desired marker and label.When the image has been marked and labeled, select submit. The screen returns to the add annotation screen. If a marker label was added, it will show up in the Image Label box. As long as the annotation is not yet published, a submitted marker can be changed through edit annotation.- X/Y coordinates: This field will display automatically after a marker has been placed on the image. It is not suggested that the coordinates be manually changed by the user. The location of the marker on the image is represented as a percentage (%) of pixels from the left of the image (x) and from the top of the image(y).
- Date to publish*: Type in any date from the date created to 5 years from that date. (The publish date defaults to 6 months from the date the collection was established.)
- Submit/Return: Select Submit to upload the annotation data to Morphbank and go back to the place where the annotation was initiated or select Return to go back to that screen without submitting any data.
Adding new Mass Annotations:
A user with a login account can annotate a group of images called a "mass annotation". Mass annotations can be made through any area in Morphbank that accesses collections i.e. Browse - Collection, Collection, Collection - Show, etc. By selecting all or any subset of a group of images, a user can request to annotate that collection by calling the add annotation screen and entering the data. This will cause an annotation record to be added for each individual image selected. Additionally, if the annotation type was a determination, then a Determination Annotation record will also be added or created through the Annotation Show function.
To access annotations through Browse - Collection, locate the collection to
annotate. Click on the  icon to open
the specific collection to annotate.
Users can also access the mass annotation process from Tools - Collection Manager, click on the Collection id of choice, then check images in a collection (check the box in the lower left side of the image). Then click Annotate Checked Objects. If only one image is selected to be annotated, the user will be directed make a single annotation.
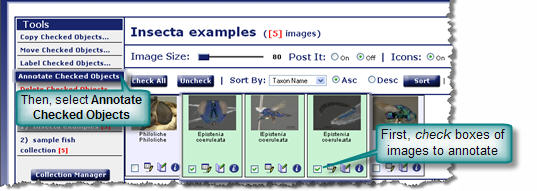
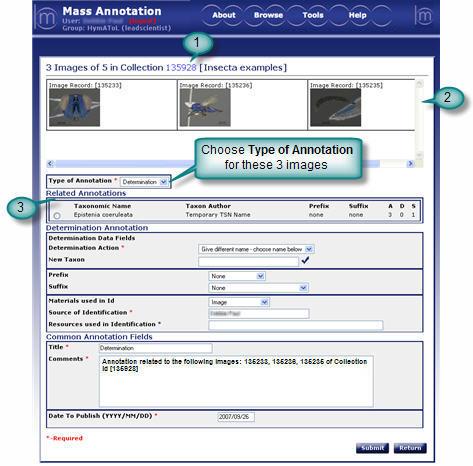
Sample Mass Annotation:
Tag descriptions
- Mass annotation heading: This displays the collection id and name that the mass annotation was initiated from as well as the number of images that were selected to annotate from the collection.
- Image thumbnails: This list of thumbnails represents the images that are included in this mass annotation. The list will scroll as needed to display all included images.
- Related annotations: (available only with the annotation type of
Determination selected.)This list will contain all specimens associated with the
images contained in tag 2 above.
- Taxonomic name - represents the lowest level taxonomic name of the specimen.
- Taxon Author - Author of the taxonomic name from the ITIS database.
- History - This contains the historic data relating to prefix(s)/suffix(s) and totals regarding previous annotations associated with this determination. A (agree with taxon name), D (disagree with taxon name), S (number of specimen(s) with that taxonomic name and collection of images).
Next |
Contents |


